Thursday 3 November 2016

Wheelchair costumes: Shenron Cosplay

Armageddon is like New Zealand's version of Comic con. Since my husband began using a wheelchair I felt like I wanted to make him feel special at Armageddon. So in our first year I made his wheelchair into the Iron Throne (Game of Thrones), the next year I made his wheelchair into a Shell Throne and he dressed as Jason Momoa's Aquaman. No one knew who he was though cos the movie hasn't even come out yet.


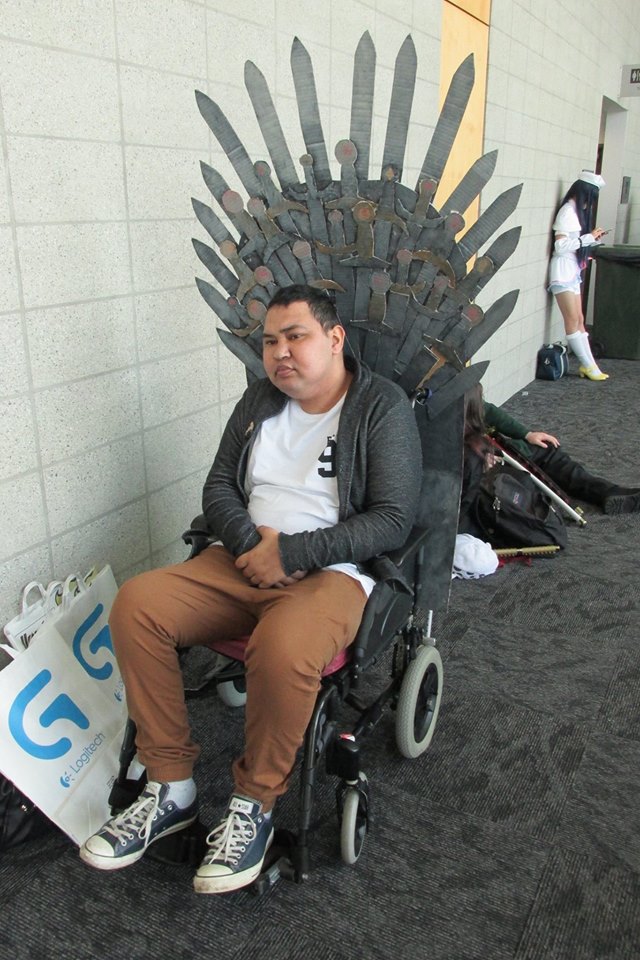
This year I wanted to try something different. I didn't want to dress up his Wheelchair as a different chair. I brainstormed for weeks and then all of a sudden there was only 2 weeks till Armageddon!

I saw this really cool image on Pinterest of a paper dragon and I thought that maybe I could make something like that but then cover it in my old comics.


I felt like Ive seen every wheelchair costume on the internet. My ideas were just too crazy and impossible to do for the time I had left. So heres how I did it and I definitely learnt a lot making this costume so maybe you can learn from my mistakes!

Special thanks to my sister who came over to help me every day!

Also I realise in these photos his right hand is right over his crotch but thats because he has a numb arm. Haha it looks a bit rude but its not meant to!


HOW TO MAKE A DRAGON COSTUME

You will need:

Wire
Wire cutters
Plyers 
Newspaper
Paper mache glue
White newsprint (Optional)
Masking tape
Paint (Green, yellow, red, black, white)
Plastic string (For the fin/mane)
Thin cardboard for the teeth
Hot glue or PVA for gluing the teeth
Hula skirt string for fin
Velcro

I started with the head and wanted make it so that it would rest on the shoulder. Crush the newspaper into a ball and start wrapping pages of newspaper around the ball to make it bigger.

Cut some wire to make the wooden antlers. I used on long piece of wire and shaped it with the pliers. Then wrap strips of newspaper to make the attachment to the head. Masking tape it down onto the ball and secure with masking tape.

Fashion a snout out of newspaper and tape it to the ball head. For my snout I used two seperate shapes so that it looked as if the snout was slightly open for the teeth.


Now use more newspaper for the details. I created the brow and the angular cheek bones for Shenron.

Paper mache about 3 or 4 layers. Then cover with white newsprint. I saved the antlers for last so that the head was secure.


Now for the body. I had quite thin wire so I went back and forth making it stronger. Then I shaped it into an S and got my husband in the wheelchair so that I could make sure the shape was right. The head would rest on the shoulder then go around the neck, across the chest like a seatbelt then around his feet.

Wrap lots of layers of newspaper around the wire then paper mache. Now heres a good tip kids- You dont need to do tiny, ripped strips for the body! I realised on my 4th layer that I could have thick strips and cover the whole body so fast. Doing the small strips was for the last layer. There were parts that felt a bit weak and thats cos I ignored them but its very important to mache every bit to keep the shape strong.


Start wrapping the body with the white news print. By this time I was lazy so I kept up with the big, long strips. 

Painting time. 


My sister painted the face by just looking at the picture of Shenron. The bottom of the face us yellow, then green face, brown antlers and red eyes. Paint black lines on the antlers to make it look more wood like.

After that was drawing in details with a vivid or black permanent marker.

After that hot glue or PVA glue the teeth onto the mouth. My sis wanted to paint it on so that would be fine too.

Then I did the same thing to the body. Painted green on the top half then a thin red line in the middle and finished with a yellow belly. 


Then paint black lines on the belly. Paint it slightly curved so that it looks more 3D rather than straight lines.
I painted the dragon body so that the bottom part was showing the belly because the character Shenron always looks like hes in motion but it wasn't necessary. 

Paint or permanent marker scales randomly on the green part of the body.

To attach the head to the body/ shoulder you can see at the top of the body there is the white bit wrapped in masking tape. I attached velcro to the top of the body and the bottom of the head. 

Now I didn't have time but I had wire that I shaped to the hubbys shoulder I would have masking taped or hot glued it to the body so that it would sit on his shoulder. It kept slipping off so having this wire frame would have been great.

The fin: It was last minute but this was made from a sort of plastic string. Its sold in most $2 shops/ dollar stores. Its the string that makes hula skirts. Its very easy and I thought it made more of an impact.

-Take 3 strings of the same length and plait. You can do this by tying a knot and putting that knot between your toes. Then plait. Or you can sellotape to a surface and plait.

-Put the plaited string between 2 chairs by sellotaping the ends to the seats. 

-Then cut lots of small pieces of string. Mine were around 15cm. 

-Take a string and bend it in half.

-Put it behind the plaited string. There will be a loop. Weave the ends of the small string into that loop and pull. Continue till the plaited string is full.

-Hot glue onto the body. Its an easy addition to the costume and I thought it made our costume that much better.


My husband had really great reactions to his costume. He has enjoyed dressing up for Armageddon and if he is well next year then I'll go with some of my even bigger, crazier ideas for costumes. I wanted to donate his costume after Armageddon but it broke near his right arm. Maybe next year!


Monday 2 November 2015

Easy Iron Throne Wheelchair costume

Talofa everyone,

Here in New Zealand we have our own version of Comic Con called Armageddon. This year was Armageddon's 20th anniversary since its humble beginning at the Avondale Raceway in 1995. I decided to make Eugene a costume after being inspired by Mica Bethea's Iron Throne costume at MegaCon 2015.


Eugene pondering over which kingdom to over take next!
I started on Wednesday and we were going to Armageddon on Sunday. It only took ONE DAY to make and ONE DAY to paint but you could probably do it all in one day if your in a rush. It was much easier then I expected so lets begin with the instructions.


You will need:

Cardboard boxes
Big piece/ pieces of cardboard for the back
Craft knife
Hot glue gun/ hot glue
Ruler
Marker/ Vivid
Paint (White, black, silver)
Masking tape (Optional)

First I took photos of the wheelchair to really look at how I could make this work. I wanted something I could easily take on and off the wheelchair so I could transport it in my little car.


This is the back of the wheelchair and I designed over the photo using a paint app on my iPad  If you don't have that just roughly sketch on some scrap paper. Its just to help you visualise how you want it.


Here we cut some holes to fit the handles into. These were quite large so when I was walking around I had a backpack at the back to hold it steady and to add some weight to it.

After sitting in the chair and realising it wasn't tall enough I hot glued another big piece of cardboard to give it more height. Then I cut it into a rough semi circle to give it a more Iron Throne shape. 


Next I drew a rough outline of where I wanted the different swords to go. There is the fan of swords that sticks out at the top the small swords just under that then lots of swords facing downward down the back of the chair. I skipped the short swords cos ehh Im a bit lazy. 


And now... Its sword making time!!!
This part was pretty easy. You just need a vivid/ marker, cardboard, ruler and a craft knife. 


 I used the first sword as a stencil and just made heaps of blades (10 large blades). Too easy mate! I also cut 8 thinner and shorter blades cos if you look at the throne there are lots of layers of swords.


 Had a look at the kind of height I got on the wheelchair and was loving it. WARNING: Think about how big your car it when doing the height and fan of swords. I forgot about that but luckily we made it work.


These are my sword handles and I made 3 different shapes just to get some variation  Not all the swords on the iron throne are exactly the same so this gave some randomness to it. Cut those out!


Next I lay my baby on the floor and kinda work out where I want each sword to go. Then matched up the sword handles randomly and glued that all down. Take your time. Make sure the hot glue is hot enough.


I was quite happy with the layout of the swords. Although I could have gone a bit higher cos I didn't have that second, short layer of swords in front of the long fanned out swords. But all good.

I also cut where the swords met the chair because I didn't see the point of painting them when no one could see it.


YEEEEE BOY check that out. Now, time for the paint job.


I have my own tarpaulin but if you don't, just grab lots of newspaper and put it on the floor. Don't want to accidentally paint your carpets, right? 

I drew some jewels and stuff on the handles but probably not necessary if you want to just paint everything grey/ silver. It is the iron throne after all.
I didn't take a photo of this step but I painted everything white before any other colour. This is like a base, if you don't do this your colours could dry darker or duller then you want so take the extra time to just do 2 quick, light coats of white paint. I used acrylic paint from a $2 shop. 

Next layer will be grey. I went for a medium grey by mixing black and white paint till I got the colour I liked. I didn't paint the sword handles cos for some reason I wanted to paint some gold and black. I just made things harder for myself to be honest. Well, ya live and learn I guess.

After all my painting was done I had this small container of silver/ metallic face paint that had been under my bed for at least 2 years. Finally I had a use for it! I started painting over the swords lightly but found it looked much better when I heaped it on. So Everything had a coat of silver on it. It would be better to use silver acrylic paint I think.


I also made Jon Snows sword 'Long Claw'. Sorry I didn't really take photos but the quick version of how to make it is: Google the dimensions of the sword, Draw it on cardboard and cut out, use that as a stencil and trace and cut 2 more swords, then glue all three together, I had a plastic cardboard so I put masking tape over it so the paint would look better. For the wolf head on the end I made a ball of masking tape for the head and snout and taped that on then just heated up my glue gun and tried to make the eyes, ears and 'fur' of the wolf. Paint and voila!


Honestly this costume was such a big hit! We had people coming up saying they loved it and asking for photos and I could hear people commenting as we wheeled on by. It really made Eugene happy and I remember when he first started using his chair he resented it and hated going out in public with it. This, to me, is progress and I was so proud of him for staying as long as he did because he's usually very tired.


Side note: This isn't very good in the wind! We had Auckland weather that day (four seasons in one day) and the wind was bending the swords back. So lucky I took my masking tape with me and patched it up inside the expo. If you want to strengthen the back swords maybe hot glue skewers or chop sticks to the back so to wont bend so easily.


Thanks for reading and I hope this helps anyone. Comment if you have any questions and if you still have time Ive got a quick story for y'all.


My dad used to collect comics in the 80s and 90s. He gave them all to me and I read them when I was younger. Now they sit in our garage and its time to declutter. I emailed Mr J at Arkham City Comics and he said he didn't mind sorting them out. Over 1000 of them! And he was sick so when he finished I said thank you very much and left. But I felt bad because I got something out of it and it took a few hours and he was sniffing and getting over a cold.


So I emailed again and asked if he he wanted a chocolate cake or carrot cake. I knew he had a stall at Armageddon and gave him the cake straight away. He really liked my husbands costume and knelt before him before accepting the cake and he looked happy. 

Of course usually Im broke but making a cake to show my appreciation is one thing I can do! If someone does something for me, the least I can do is think of someway I can afford to pay them back. Hope it was yummy! 


Thanks for reading, Ofa atu. 


Wednesday 3 June 2015

My first cake with fondant

Fakaalofa lahi atu and welcome to our humble blog.

This week I completed a 'TURBO CARS' themed cake for a family member whose son, Isaac, was turning one. This was such an honour and I got some great feedback. Sure, it doesn't look as good as the cakes on Pinterest but I'm sure I'll get there!


I only have white fondant because coloured fondant and gum paste is so expensive! (Well, to me anyway.) So I painted my cake and fondant toppers with food colouring and honestly it's so effective! And cheap! (I love cheap but chic... You know what I mean)


The cake was kinda a disaster- I covered a chocolate cake in chocolate ganache and left it in the fridge overnight. When I took it out in the morning it was fine. 
Then 10 minutes later it started getting gloopy and sticky and really wet. I was freaking out!!!

So I used my best friend GOOGLE and saw that I should try to use a fan to dry it out. 
With an hour to go, I just had to paint it so I did and I tried to cover the worst part of the black road with the car.


These cupcake toppers were really easy to make! All I did was make the design on PicMonkey and printed it out. Just to save your time I learnt that when you design your topper, DUPLICATE it and place it above your first topper. That way when you cut it out, you just need sticky tape the stick so its double sided. 

These were really simple. If I had more time, or could afford photoshop these would be 100.

Then I cut them out with my craft knife or scissors and used double sided tape to stick to the skewer.


Mmm chocolate ganache! 


Mmmmm cupcakes! 

Chocolate cupcake with dark chocolate ganache and nanas banana cake with a dot of vanilla buttercream frosting.


Freestyle painted the flames around the sides of the cake with a small thin brush. Painted with the yellow top first then the red bottom and tried to blend in to get an orange in the middle.


Happy birthday Isaac and thanks to my family who gave me the honour of making your cake. I can't wait to try more cakes. I'm practicing to make a cake for my Grandma and Grandpas 70th birthday and 50th wedding anniversary cake at the end of the year. I can't wait because when they got married they never had a wedding cake so this is so important for me to create the wedding cake they will love. Definitely gonna get some Island flavour in the design  so watch out for that in December. 

Faa everybody xo