Monday, 23 February 2015

Pancake palace at Nathan Homestead

MALO E LELEI FAMILI,

Pancake palace strikes again at Nathan Homestead in Manurewa on Saturday 21 February.


I was so happy to set up my food stall/ bake sale at the Manurewa Hidden Treasures Family Fun Day. The day wouldn't have gone so smoothly without the help and support of my family.


I sold a pancake for $2 each (Plain or chocolate chip) and you could choose as many toppings as you wanted including cream, maple syrup, chocolate syrup, sprinkles, bananas, berry compote, chocolate chips, M&Ms and maltesers. My Dad is famous for making pancakes at family lunches and family friend dinners. A tradition we have is to always eat the first pancake because its usually the worst. Its a nice way to share a little something with the family and we have saved a few batches by tasting that the butter or sugar is missing!

I didn't really take photos because I was too busy working hard. We only took a couple of snaps at the beginning sorry.

But other than pancakes I also had slices for sale. All 3 slices were really nice but thinking back on it, the cost of the ingredients didn't work for trying to make any profit. We had malteser slice, apricot bites and our families Leilua crunch.


Tip: I put baking paper in all my baking tins before I put in the mixture so that cleaning is 100% easier and lifting up the finished slice to cut is too easy :)


The malteser slice was SOLD OUT


Oh yum I wish there were some slices left... 


Beautiful toppings for the pancake people. 

Pancakes are so easy to make so it was a really good seller. If I have the chance next time Im going to make cupcakes on the side. Cant wait to show you what ideas I have next- now its just finding the money to pay for my dreams. The life of a starving artist. 

I noticed that advertising on Facebook helped. Everyone who commented on the status showed up and everyone who came had never been to Nathan Homestead before. Im surprised and glad that this day was help because it is a hidden treasure in Manurewa. 
The Manurewa community has a reputation for being a bit dangerous. The 'South Side'. Its a low income and multicultural community which has different cultures including Pacific Island, Asian, Indian, Maori and Pakeha (European). 
 I grew up in Manurewa and was lucky enough to go to holiday programmes at Nathan Homestead with my sister and my cousins. I remember ice cream days and making a lions mask out of clay and doing drawing lessons. Im just happy to see people discover this great place and to share it with their kids. So I guess my last message is to try new things in your own community and if your near the Botanic gardens or Totara park then stop in to Nathan Homestead or look up the website- they do some really cool classes for kids and adults.

Happy pancakes people.


Tuesday, 17 February 2015

A special Valentines on a budget

Valentines day isn't really a big thing in New Zealand. Well, not that I know of! Most people just spend it with their partners going on dates and buying small gifts- the usual chocolates or flowers or just being extra nice. We don't do it as big as in America but thats OK. For me its all about showing your appreciation for your partner and reminding them how much you love them.

I usually don't do anything other than a small gift on Valentines but one never knows how many Valentines we will experience so I wanted to make this one extra special for my husband Eugene. My husbands right side of his body has been affected by his brain tumor so its very hard for him to walk and travel so I decided I would do something special at home. I didn't need to break my bank for a memorable date at home and I had such a beautiful time. The whole family got involved and were so happy to see Eugene and I happy together and in love. But enough mushy stuff...

We have a kind of shelter just at the back of the house so I decided thats where I'll set the scene.

What you'll need:

- Gun stapler and staples
- $3 table cloths (I thought they were rectangle but the were square- read the package people!)
- Coloured paper
- Scissors
- Vivid/ Marker
- masking tape/ sellotape


This was really fast and easy to set up. You can pick these up at most $2 shops and you can pick any colours. White looked really great with the white hearts. First you take one corner and staple it to the wood. Then, from the corner you just stapled, move the gun stapler down and staple the middle of the table cloth to secure it. Then you can staple the opposite top corner to the middle of the top wooden bar. Then gather the rest of the material and staple it to the post. I bought 6 table cloths in total plus the pink table cloth for the table. 

The paper hearts were cut from coloured paper and stuck to the table cloth. Easy peasy!


I like the white and red combo the most.


Left over hearts were stuck to the fence with masking tape. I find it much easier to stick to the wood and its easier to peel off.
You can kind of see the fairy lights at the top of the photo. They looked great at night time- Having dinner under your own personal universe. 


We even had flowers and candles. Just decorate the table with whatever you think looks pretty and Im sure it will look lovely. Even picking whatever flowers you have in the garden would be great.


I even made a special treat for Eugene which he has been asking me to make for him again. A South African recipe of Peppermint Crisp tart. This was my first try at making this and I couldn't believe it was so easy.

Heres a bonus recipe for y'all-


They sell the Nestle Peppermint Crisp chocolate bars in South African shops in Botany. 

200g Peppermint crisp chocolate
250ml cream
1-2 Pkt of Nice biscuits
1 can of caramel condensed milk

  1. Mix the caramel so its smooth in a bowl.
  2. Whip the cream and add to the caramel.
  3. Grate the chocolate and add to the cream/ caramel mixture. Leave some chocolate bits for sprinkling on the top.
  4. Place a layer of Nice biscuits in a baking tray/ slice tray then alternate between the cream/ caramel mix and biscuit layers till you reach the top. 
  5. Sprinkle with the leftover chocolate bits then refrigerate for 1 hour before serving.
Eugene absolutely loved it and so did I. Well, this just shows you don't need to do much to make someone feel special on Valentines day. You don't need it to be Valentines to show your partner you love them. Just think about what they like and enjoy the moments you share together. 

Much love to everyone. 

Ella


Friday, 2 January 2015

MY COMIC HEADBOARD


I bought myself a duvet for Christmas and the wall behind our bed is quite plain. So I scanned my comic covers and laminated them. These are the same comic covers I used for my superhero party photo wall just laminated and cut out.

50 laminating sheet cost me about $12 so I bought 2. 


Nearly finished. Sorry about the glare.


You could use any kind of artwork for the head board. I stuck mine on with blu tak. Make sure you put blu tak on each corner and in the middle of the sides so that the pages look flat on the wall. 

If you don't like the shine of the laminated pictures you could just print out the pages and stick it to the wall and if you dont like it in 6 months time just rip it down!

My husband and I are very happy with the outcome and I'll keep you updated on more upgrades in our room.

TROPICAL CHRISTMAS


Hi y'all, 

In New Zealand our Christmas is in summer so this year I decided to theme our family Christmas as a 'Tropical Paradise'. There was a lot of looking through Pinterest to get ideas. Everyone really enjoyed themselves and I had a lot of helpers to set up.


I got the tutorial from the blog 'Hostess with the Mostess'
http://blog.hwtm.com/2014/03/diy-giant-paper-flowers-tutorial/

I stuck the paper to the small plastic plates which helped with the flower petal shapes. 


Because the theme is tropical I found a net made of string at look sharp in Papatoetoe for $8. It was quite long and I hung it up with three 3M hooks. Then I bought coloured pegs and pegged printed family photos that people could take home for their own families to look at. The older black and white photos were the most popular. 


Tables were set up outside to keep everyone together.


Tiki torches kept out of the way till night time.


A few of the flowers fell off but it served its purpose for the day. Everything was a bit of a rush so I didn't secure them as well as I should. I stuck the plastic plates to the wood with a hot glue gun.

Leftover paper flowers were chucked in the garden.


We played bingo and everyone had to bring $10 worth of groceries to play. I just downloaded a bingo number generator app and people who didn't want to play were calling out the numbers and gathering the prizes.


The pineapple punch glass dispenser was bought from Kmart for $25. 
1x White wine
2 Cups vodka
4.5l juice

Frozen juice makes the punch stay cold and doesn't water it down. You can freeze the juice in plastic cups or yogurt containers or anything really. 

TROPICAL CHRISTMAS IDEAS

Punch
Umbrella straws
Tiki torches
Flowers
Fishing net
Bingo

Themed food- Prawn twisters, chop suey, rice, roast ham, salads
fruit skewers, fresh fruit and ice cream.


The bingo was a nice substitute for buying presents for the family. Everyone had a really great time.
Merry Christmas 2014!


Thursday, 11 December 2014

Dealing with chemo and radiotherapy as a partner

My husband has a brain tumor. 

We realised in April when he was rushed to the hospital because his brain was haemorrhaging. He survived surgery, chemotherapy and radiotherapy. Now I just turned 21 this year and this hasn't been easy at all. Heres some tips you might learn from to make this easier for yourself or your partner.

1. Your a team. You have to work together.

You can't just be a caregiver to your partner. You need to make sure he understands that your there to support him but at the same time he's not the only one affected by this big change. 

2. Don't forget to look after yourself.

This is so important and I think a lot of caregivers skimp out on this. You can't help anyone out if you don't take care of yourself. Make sure your still having lunch with your friends and talking with your family. In the beginning it was hard because I hadn't seen my family in awhile but they always want to be there for me and support me so thats what you want.

3. Communicate as best as you can.

This was hard for me because my husbands tumor is on the part of the brain where he understands speech and he needs to concentrate to listen and converse. But you need extreme patience. Its just as frustrating for him as it is for you.

4. Be ready for anything.

You will always need tissues in your house. And if your packing a bag for the hospital we have a parking slip, wet wipes, mints/chewing gum/ some kind of activity (Eugene likes playing on the phone or tablet) hand sanitiser and tissues. 

5. Never go to bed angry.

There is so much stress to deal with everything thats happening you have bills and you need money, petrol, food, you want to go out and experience new things and its christmas soon and that persons birthday that you forgot about on top of that you have rehab and physio as well as treatments with going to radiotherapy in the city everyday and taking your steroids and chemotherapy pills. Not everything happens at the same time but you get the idea. You can stress. But you have to deal with it by being as organised as you can. Don't take it out on your partner. Go and talk to someone you love and trust. You are there to support and love your partner. Never go to bed angry!

Ella


Thursday, 11 September 2014

How to fold a paper crane

This year one of my goals is to fold 1000 paper cranes for my husband Eugene. According to Japanese legend if you fold 1000 origami cranes you will be granted a wish. This legend was made popular by Sadako Sasaki who was 2 years old when she was exposed to radiation from the atomic bomb that dropped in Hiroshima during WWII (6 August 1945). The crane has now become an international symbol of peace. So today Im going to teach you how to fold this very easy origami crane.


Start with a square piece of paper. You can get a perfect square from any piece
of paper by folding it in half and cutting off the extras.

Add caption

Fold the square in half to make a triangle.


Fold the triangle in half again to crease it.


Now this is a kind of tricky part. You want to bring the creased/ folded triangle back and open it so you can  fold it straight down and you will get a diamond/ square. The next few pictures show that move in a series- sorry its hard to take photos and fold at the same time! 


So thats what it should look like when you fold it down.


Flip over and do the same thing on the other side.


Both sides are now folded.


Now you want to make a sort of kite shape by folding one side of the paper to the centre. Notice its only one flap, not both.


Do the same on the other side- The side on the right is a bit crooked but thats OK.


Now flip it over and do the other side- folding towards the centre.


Now at the top theres a little triangle- Bend it forward and backwards to crease it. This is going to help us in our next step.


Open one side of the kite shape. This is the other kinda tricky part. You want to lift from the bottom and bring it up towards our little triangle and fold the outsides in so it makes a long diamond.

Going up towards our small triangle.


This is the folding in action. 


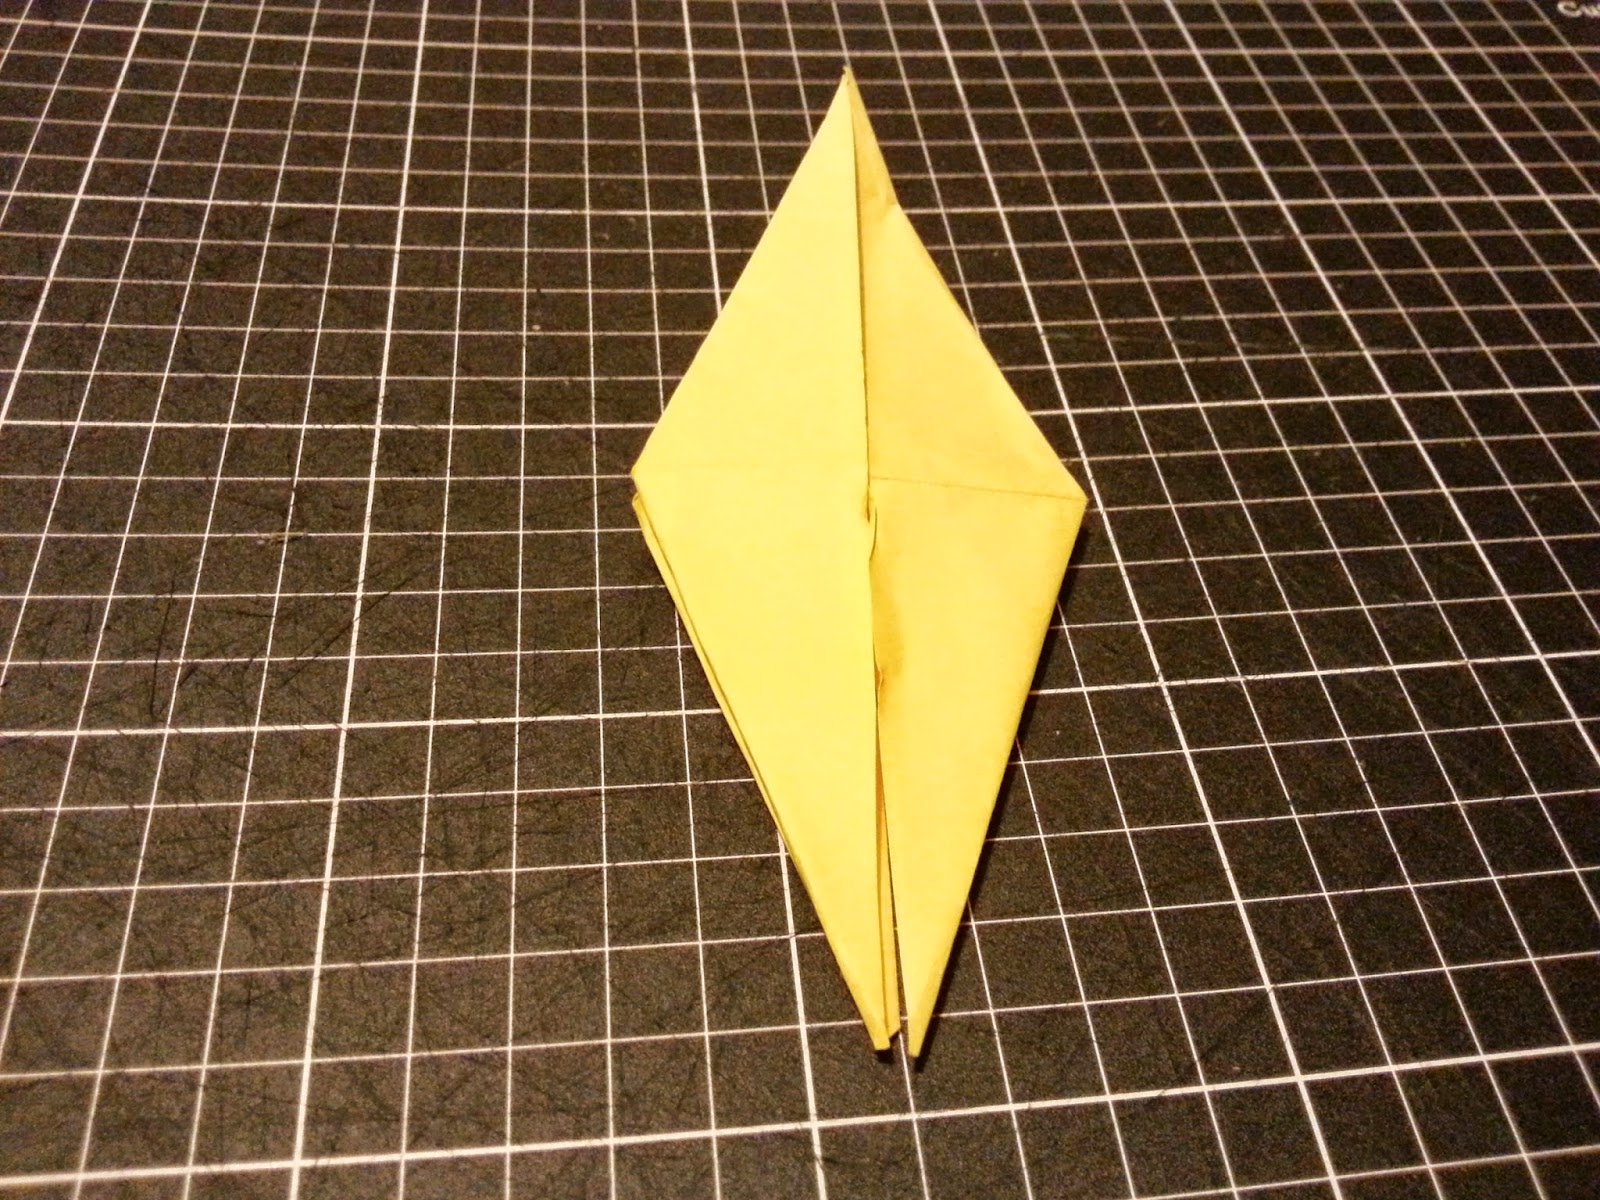
It should look like this long diamond. Now flip over and do the other side the same.


On one side theres a little triangle between the flaps.


You want to fold towards the centre again (Kite) and the little triangle between the flaps will be at the top (Thats the body).


Now you want to pull the flaps up gently sideways to create the head and tail.


This is a side view of the process- pull up and fold to make it stand out.


Now do the same process on the other side.


You can fold down one side to make the birds head and beak. 


You can pull out the wings to the sides and this will puff out the body.


Use and paper you can find and try this out. 


This is my collection so far for my thousand cranes but Ive decided that the big ones are too big and the little ones look better. 

TO MAKE A ORIGAMI CRAIN CHAIN:

You need- needle, thread, cranes

Put your thread through the needle eye and tie your thread together at its ends. It doesn't matter what colour the thread is so use whatever random colour is sitting in your cupboard. Put the needle through the bottom of a crane and carefully pull the needle through the body and stack your cranes on top of each other. I find mine looks better without spreading the wings. Some people like to put beads between the cranes but you don't have to! Have fun! I hope you can share your cranes with me.